Greed Mode
Greed mode is a game mode introduced in The Binding of Isaac: Afterbirth.
Gameplay

In Greed mode, each floor has a ![]() Curse Room, a
Curse Room, a ![]() Devil Room/
Devil Room/![]() Angel Room, a double-wide Shop, and an exit room all connected to a main double-height arena room with a button in the center. A
Angel Room, a double-wide Shop, and an exit room all connected to a main double-height arena room with a button in the center. A ![]() Super Secret Room is also connected to one of the rooms. Up until the penultimate floor, an already unlocked
Super Secret Room is also connected to one of the rooms. Up until the penultimate floor, an already unlocked ![]() Treasure Room with a silver door frame and a normal locked Treasure Room are also available. The silver Treasure Room always gives items from the Boss pool. The sixth floor (The Shop) does not have any Treasure Rooms but does have the Shop and Curse Rooms. The final seventh floor has no waves and contains only three rooms, the largest of which contains the game mode's final boss.
Treasure Room with a silver door frame and a normal locked Treasure Room are also available. The silver Treasure Room always gives items from the Boss pool. The sixth floor (The Shop) does not have any Treasure Rooms but does have the Shop and Curse Rooms. The final seventh floor has no waves and contains only three rooms, the largest of which contains the game mode's final boss.
When playing Greed Mode, a yellow coin (![]() ) will appear on the HUD, below the consumables.
) will appear on the HUD, below the consumables.
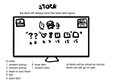
Shop
As there are no normal drops in Greed mode, the Shop becomes Isaac's primary source of items and pickups. Shops in Greed mode automatically restock. Shops will always have six items/pickups for sale, sometimes discounted; in order from the left side of the room to the right, these will always be:
- A
 Key
Key - A red heart
- A Shop item
- A Boss item
- Two random pickups, trinkets, or items from the Treasure Room pool.
There will also almost always be two ![]() Shopkeepers near the center of the room, as sometimes just one special shopkeeper spawns instead.
Shopkeepers near the center of the room, as sometimes just one special shopkeeper spawns instead.
Layouts
The following room maps were made using Basement Renovator for cleaner viewing.
| ID | Contents | Image preview |
|---|---|---|
| 0 | A |
_0.png)
|
| 1 | A restock box, a |
_1.png)
|
| 2 | A restock box, a |
_2.png)
|
| 3 | A restock box, a red heart, and two random pickups behind key/iron blocks. | _3.png)
|
| 4 | A random heart and a Reward Plate. | _4.png)
|
| 5 | A |
_5.png)
|
| 6 | A restock box, a |
_6.png)
|
| 7 | A restock box, a |
_7.png)
|
| 8 | A restock box, a |
_8.png)
|
| 9 | A restock box, a |
_9.png)
|
| 10 | A |
_10.png)
|
| 11 | A restock box, a Reward Plate, and two random pickups behind rocks and spikes. | _11.png)
|
| 12 | A random heart pickup and a random pickup and |
_12.png)
|
| 13 | A restock box, a |
_13.png)
|
| 14 | A restock box, a devil beggar, a half red heart, and a Reward Plate behind spikes. | _14.png)
|
| 15 | A restock box and a beggar. | _15.png)
|
| 16 | A slot machine and poop. | _16.png)
|
| 17 | A restock box and fortune teller. | _17.png)
|
| 18 | A restock box, a blood donation machine, and two random pickups behind rocks. Note that all blood donation machines are automatically replaced with devil beggars in greed mode. | _18.png)
|
| 19 | A random pickup behind rocks. | _19.png)
|
| 20 | A restock box, a locked chest, and two random pickups behind rocks. | _20.png)
|
There is an overall ~71.42% chance (15/21) that a shop will have a restock box.
Arena
The 1x2 room in the center of all floors except the final one is the Arena, where most of the game mode’s coins and enemies come from. These rooms always have a button in the center that, when pressed, bars all the doors and starts spawning waves of enemies and coins. While active, the button has a timer underneath it that counts down; when the timer runs out or all enemies in the current wave are killed, the next wave spawns. This continues until wave 8 or 10 is reached, Isaac dies, teleports out of the arena or presses the button again. Pressing the button before all the waves have spawned deals half a heart of damage to Isaac (or removes 1 penny from the next wave if playing as ![]() The Lost or
The Lost or ![]() Tainted Lost) and stops the timer that causes waves to spawn automatically. Once the timer stops and all remaining enemies are killed, the doors re-open. The button can then be reactivated to continue progressing through the waves. All waves except the optional “nightmare” wave must be completed for the door to the next floor to open.
Tainted Lost) and stops the timer that causes waves to spawn automatically. Once the timer stops and all remaining enemies are killed, the doors re-open. The button can then be reactivated to continue progressing through the waves. All waves except the optional “nightmare” wave must be completed for the door to the next floor to open.
For the first 8 waves, the timer will start at a set time and then increase by 1 second for subsequent waves. For ![]() Basement and
Basement and ![]() Caves, the clock starts at 6 seconds. For
Caves, the clock starts at 6 seconds. For ![]() Depths, the clock starts at 5 seconds. For
Depths, the clock starts at 5 seconds. For ![]() Womb, the clock starts at 4 seconds. For
Womb, the clock starts at 4 seconds. For ![]() Sheol and
Sheol and ![]() The Shop, the clock starts back at 6 seconds again. The first boss wave is set at 33 seconds (30 after
The Shop, the clock starts back at 6 seconds again. The first boss wave is set at 33 seconds (30 after ![]() Everything is Terrible 2!!! is unlocked) on all floors.
Everything is Terrible 2!!! is unlocked) on all floors.
The enemies spawned by each wave are determined by the wave number and current floor. For the initial set of eight waves, the first three waves will use the floor’s “easy” enemy pool, the three waves after that use the floor’s “medium” enemy pool, and the last two waves use the floor’s “hard” enemy pool. For the ending two waves, the first wave uses the floor’s “easy boss” pool, and the second wave uses the floor’s “medium boss” pool. Upon completing the second boss wave of the floor, an optional nightmare boss wave, which uses the floor’s “hard boss” pool, can be started by pushing the button again. Clearing the wave grants access to the floor’s ![]() Devil Room/
Devil Room/![]() Angel Room. Note that “boss” pools can include multiple (mini)bosses spread out across the room.
Angel Room. Note that “boss” pools can include multiple (mini)bosses spread out across the room.
![]() Enemies can spawn as Champions as normal, but will not drop pickups, with the exception of
Enemies can spawn as Champions as normal, but will not drop pickups, with the exception of ![]() The Hollow's gold champion, which drops coins as normal. Rainbow champions drop consumables too, albeit only appear in Sheol in
The Hollow's gold champion, which drops coins as normal. Rainbow champions drop consumables too, albeit only appear in Sheol in ![]() Greedier version of the mode.
Greedier version of the mode.
At the start of each wave, Pennies are dropped on the ground, which Isaac can use in the Shop to purchase items and pickups. Each normal wave drops 2 pennies, each boss wave drops 4 pennies and you get a bonus coin after passing through 3 waves without getting hit in your red hearts. That means on a full hitless floor, you'll get an extra coin on waves 4, 7 and 10, bringing the total of coins earned to 27 per floor. This extra coin mechanic explains why sometimes you can get a coin on the "nightmare" wave: if you get hit in the red hearts on the 7th wave but don't get hit on the 8th, 9th and 10th waves, you'll get the extra coin on the 11th.
Each new wave counts as a new 'room' for purposes of item charges, familiars dropping items or the like. However, one-room temporary effects, such as ![]() The Book of Belial, will remain across waves, and items that activate upon entering a new room will not activate when a new wave starts.
The Book of Belial, will remain across waves, and items that activate upon entering a new room will not activate when a new wave starts.

 Taurus is an exception and will activate each time the button is pressed to start a wave.
Floors
Greed mode has seven total floors, five of which are based on floors found in the main game. These floors are ![]() Basement,
Basement, ![]() Caves,
Caves, ![]() Depths,
Depths, ![]() Womb,
Womb, ![]() Sheol, a unique floor called
Sheol, a unique floor called ![]() The Shop, and the final boss floor. Each floor will spawn enemies and bosses native to that floor in the main game, except for The Shop, which has no counterpart outside of Greed mode. Instead, The Shop spawns mostly Greed enemies, but can also spawn enemies from any floor. The Shop is the only normal floor which does not contain Treasure Rooms.
The Shop, and the final boss floor. Each floor will spawn enemies and bosses native to that floor in the main game, except for The Shop, which has no counterpart outside of Greed mode. Instead, The Shop spawns mostly Greed enemies, but can also spawn enemies from any floor. The Shop is the only normal floor which does not contain Treasure Rooms.
![]() Greed mode floors can appear as their variants with unique waves including
Greed mode floors can appear as their variants with unique waves including ![]() Burning Basement,
Burning Basement, ![]() Cellar,
Cellar, ![]() Flooded Caves,
Flooded Caves, ![]() Catacombs,
Catacombs, ![]() Dank Depths,
Dank Depths, ![]() Necropolis,
Necropolis, ![]() Utero, and
Utero, and ![]() Scarred Womb.
Scarred Womb.
Ultra Greed
The Ultra Greed floor contains only three rooms: An empty starting room, a Mini-Boss Room in which multiple ![]() Greeds,
Greeds, ![]() Super Greed,
Super Greed, ![]() Wrath or
Wrath or ![]() Monstro will spawn, and the final Boss Room containing
Monstro will spawn, and the final Boss Room containing ![]() Ultra Greed.
Ultra Greed.
After Ultra Greed has been defeated, turning him into a golden statue, a Final Boss Chest to end the level and the ![]() Greed Donation Machine will spawn. Isaac is given the chance to donate his remaining money to the Greed Machine, which will unlock several rewards including the
Greed Donation Machine will spawn. Isaac is given the chance to donate his remaining money to the Greed Machine, which will unlock several rewards including the ![]() Keeper character.
Keeper character.
 Greedier Mode
Greedier mode is a harder version of Greed mode. When playing Greedier mode, a small, red stained coin (![]() ) will appear on the HUD, below the consumables.
) will appear on the HUD, below the consumables.
You must ![]() Donate 500 Coins to the
Donate 500 Coins to the ![]() Greed Donation Machine to unlock it.
Greed Donation Machine to unlock it.
Greedier mode changes gameplay in the following ways:
- An additional “hard” wave is added to the initial set of 8 waves, bringing it up to 9.
- The time the clock starts at is shorter (with the exception for Basement and Caves' mob waves).
- Coin drops per wave are modified to give fewer coins overall.
- Waves 1-8 drop 1 penny.
- Wave 9 drops 2 pennies. (total 10 coins from mob waves)
- The first boss wave drops 3 pennies.
- The second boss wave drops 6 pennies. (total 9 coins from boss waves)
- Plus the extra coin mechanic explained above that can give 3 additional coins, bringing the potential total to 22.
- Basic enemies have a chance to be champions. They will not drop pickups, unlike the regular game.
- The final boss gains a second phase.
- The Greed Donation Machine's chance to jam is greatly reduced, making it much easier to fill out.
Greedier mode unlockables were separate from Greed mode unlockables; however, as of Booster Pack #5, completing Greedier Mode with a character will also unlock the corresponding Greed mode unlockable.
Despite being a "hard" version of Greed, most hard mode rules from the vanilla gamemode don't apply.
Unlockable Achievements
Greed Mode
Greedier Mode
Completing Greedier Mode with a character will unlock the corresponding Greed Mode unlockable if it hasn't been unlocked.
Greed Machine
Tips
- Flight will not prevent damage from the spiked stop button unless the player is
 The Lost,
  Tainted Lost, or
  Tainted Forgotten.
- However, a Penny is deducted from the next round of rewards if the button is pressed as The Lost or Tainted Lost. It is possible to negate this by triggering the button and surviving until all waves have spawned before quitting out. When you reload the save, all of the coins will be on the ground. Pressing the button again will start the waves from wave 1. You can now press the button to cancel waves with no loss of coins.
- However, a Penny is deducted from the next round of rewards if the button is pressed as
- Items with effects that only persist in the room are especially useful in Greed mode. Complete all waves in one go to maximize their efficiency. Examples of such items include
 Box of Friends,
  The Book of Belial,
  Lusty Blood,
  The Pinking Shears,
  Scissors, and
  Sulfur.
 - Being teleported by the Curse of the Maze can open the exit door without needing to complete the floor, allowing large portions of a run to be skipped.
- Only a half heart of damage is taken in floors beyond chapter 3, a feature unique to Greed mode.
- This makes items such as
 The Wafer substantially less useful, since there is a limited number of enemies that could cause more than a half heart of damage. However, they can still be used for the Ultra Greed boss fight, since all of his attacks deal a full heart of damage.
- This makes items such as
- Killing all the enemies before the timer resets doesn't increase the number of coins produced.
- It is highly advised to destroy polyps, mushrooms, fires, and sometimes even ordinary rocks before starting a wave, as they might cause you to take unavoidable damage.
- It is also often a good idea to get rid of pickups on the ground if possible, as they could be handicapping your ability to aim or dodge in a relatively cramped arena.
- Due to the fact that the mode lacks a presence of rocks, finding crawlspaces is way easier.
- Using keys or bombs to open golden and stone chests is almost always worth it since it's highly likely that it will return your bomb, key, or other pickups; it could even give you something like
 A Quarter.
 - Trying to stay somewhere in the middle of the room is pretty smart as it allows you to see most of the arena from the bird's eye view, as well as avoiding potential instant damage.
- It is often a good idea to press a button when the arena is flooded by invulnerable entities like floating heads or spike blocks, so that they are guaranteed to die once everything is over. Pressing the button isn't necessary since these types of enemies cease to exist after a wave clear anyways, however it is a good idea to do so if you get surrounded.
- Firing non-stop is not always the wisest thing to do as it can lead to instant damage, from something like explosions for example. Items like
 Cursed Eye and
  Chocolate Milk help avoiding that, although Cursed Eye is still a double edged sword.
 - If it feels like a boss' Healthbar lasts too long it might be a good indicator that there's another boss spawned alongside the one you can see, just hiding in the ground.
- Buying
 A Lump of Coal might not always be the best idea, especially with Devil's precedent locked in — since it has good odds to reappear from Krampus. This happens even if you've taken the item already, let alone just encountering it without buying.
 - "The Shop" penultimate chapter often spawns several shopkeeper entities throughout the waves, which can be blown up for extra cash.
- The dead shop keepers have a very low chance of dropping
 Steam Sale |
  Counterfeit Penny and other useful outcomes when bombed.
 - Sometimes spending the acquired pennies may be wiser on the next floor. Certain collectible items, hearts or keys may be on sale a depth below, which saves money compared to refilling them when not yet necessary.
- Any form of homing is tremendous in this gamemode as its' effect covers a relatively large part of the arena.
- "Ace of" cards are very helpful to use on spawning enemies — be it to heal up or gain resources.
 Sack Head tends to replace the coins
  Ultra Greedier's coin explosions spawn, which can be useful for Tainted Lost with a clutch
  Holy Card. Alternatively - it could be useful for battery drops instead.
- There are methods of achieving infinite coins/items. Although difficult to coordinate, and sometimes heavily reliant on luck, these methods can practically guarantee a successful run. These strategies can be combined with
 Chaos to allow stronger items to be obtained more easily.
- Method #1: Requires a
 2 of Diamonds card, the
  Blank Card, a Shop selling
  Lil' Batteries, and enough coins to buy one. This allows infinite coin count doubling with no drawback.
 - Method #2: Requires a
 Rune of Jera, the Blank Card, a Shop selling Lil' Batteries, and enough coins to buy one. Similar to the first method, but instead of doubling Isaac's currently held coins, this method allows for infinite duplication of Pennies dropped during waves.
- Since Blank Card no longer copies the ability of the runes, this method no longer works with Rune of Jera, so instead you need
 Clear Rune in place of Blank Card, a Shop selling Lil' Batteries, and enough coins to buy two, as Clear Rune requires 12 charges to copy effect of Rune of Jera.
- Method #3: Use
 Diplopia or the
  Crooked Penny on a Steam Sale. This will allow Isaac to take as many items as desired for free.
- This method is no longer infinite, as stacking multiple Steam Sale uses a new algorithm.
- Method #4: Requires
 Swallowed Penny and a discounted red heart (2c). Use the curse door by entering and exiting right after losing only half a red heart and spawning a coin. By repeating the process long enough you can get infinite coins, Swallowed Penny being able to spawn nickels and dimes and being guaranteed 1 penny per half heart. If
  Mom's Box is held, this method can be performed without a discounted red heart as the number of coins spawned by Swallowed Penny will be doubled.
- Method #1: Requires a
- The
 D20 can be used in tandem with Lil' Batteries to re-roll all Pennies dropped during combat, some of which will become Grab Bags or chests. The process can then be repeated indefinitely.
 As the D20 re-rolls all opened chests into pickups, chests should not be opened unless the D20 is fully charged.
- Using the D20 in conjunction with the
 Book of Virtues will destroy all pickups in the room; as such, the D20 should not be picked up while playing as
  Bethany.
- In Greedier mode, upon defeating Ultra Greedier, all poops, whether destroyed, damaged or intact, will be converted into
 Golden Poops.
- As a result,
 A Card Against Humanity can be used to guarantee a large source of coins for the Greed Donation Machine.
- Poops spawned inside of the Ultra Greedier fight are turned into yellow colored poops, and drop normal brown poop pickups.
- As a result,
- Common display resolutions, such as 1920x1080 with aspect ratio 16:9, will show only part of the arena in fullscreen mode. Switching to windowed mode and then resizing the window makes it possible to keep an eye on the entire arena while playing.
Helpful Items
As mentioned above, all items that grant a temporary buff or benefit that expire once Isaac leaves the room are extremely powerful in Greed Mode, as these effects can last an entire floor's worth of waves, and some can be stacked. Items typically useful in Normal Mode that are not enhanced by Greed Mode's nature are not listed.
- Steam Sale: Reduces prices so that more items can be bought, and saves more money for the Greed Machine.
 Sack of Pennies / A Quarter /
  A Dollar: Provides an abundance of money.
 Mystery Sack /
  Sack of Sacks /
  Bomb Bag: Provides more pickups, especially bombs which are scarcer in Greed Mode.
 Keeper's Sack: Due to the gamemode's nature, many stats ups will be granted by this item very frequently.
 Leech /
  Charm of the Vampire: The large amount of enemies means more healing.
- Crooked Penny: May be used to duplicate all shop contents. If Crooked Penny fails, the shop could simply be rerolled to replenish its contents.
 Brown Nugget: Multiple flies can be spawned in the arena before starting the waves.
 Akeldama: Slows down and damages chasing enemies, who can get overwhelming as the waves get shorter.
 Lemon Mishap /
  Free Lemonade: Deals great AoE damage.
 Sprinkler: Can be used multiple times in one arena.
 Gnawed Leaf: Allows for passive damage through familiars while staying invincible.
 Mega Blast /
  Mega Mush: Long lasting effects that can trivialize a floor.
 Plum Flute: Baby Plum is able to damage way more enemies as they are usually strewn about in the room.
 Star of Bethlehem: Always present in the middle of arena, allowing for great DPS increase, though it also makes accidentally pushing the button easier.
 Red Stew: The damage buff can be sustained by the constant onslaught of enemies.
 The Stairway: As long as one remains in the arena at the start of a floor, the ladder won't disappear. This allows Isaac to get richer before going into The Stairway's deal.
 Quints: Gives you a persistent source of help during all the waves.
 Jar of Flies: The high enemy count of Greed Mode causes Jar of Flies to generate stacks very quickly.
 Ocular Rift /
  Lodestone /
  Black Hole: Can suck up many enemies in large chunks garnered in close proximity.
 Hungry Soul: Very useful in a run since massive formation of enemies are ever-present throughout.
 Purgatory: Can be timed to fire a ghost right as a new wave generates.
 Azazel's Rage: Triggers every 4 waves and can easily wipe out every enemy in the arena.
 Larynx: Cleans up the enemies fast as well as preventing hits with high likelihood.
 D10: Downgrades all the enemies in the room, useful because of the low charge amount.
 Birthright +
  Tainted Cain: Purchasing an on-sale item over and over while having Birthright results in almost infinite consumables.
 Betrayal: Charms every enemy when hit, allowing an entire wave to be cleared at the cost of one hit.
- Betrayal: The high enemy count will cause them to harm eachother more often.
 The Candle: Can be used to wipe out clusters of enemies, which helps prevent overcrowding.
 Black Candle: While most curses don't especially matter in Greed Mode, Curse of the Blind is especially devastating, making immunity to it very valuable.
 Paschal Candle: Quickly gains stacks, especially later on, due to the short wave timer.
 Cube of Meat &
  Ball of Bandages,
 Mom's Heels,
 The Virus,
 Serpent's Kiss and
  My Shadow: Since the mode prevents telefragging for a tiny amount of time even if enemies spawn on top of you - the contact damage trait of that item becomes very useful to instantly kill those that spawn on you with no consequences, however it can turn out badly if said monsters are explosive.
 Keeper's Kin: Provides support in early floors due to the abundance of rocks.
 Glass Cannon: helps immensely with clearing waves, it's possible to even use it in advance before pressing the buttons to get use of 2 shots in a row.
 Potato Peeler: Meat boys can be created in mass due to the abundance of HP ups available in the shop. Isaac also emits damaging creep for the current room after using the item.
 Book of the Dead: Spawns bone orbitals or charmed
  Bonies when there are killed enemies in a room. Making this item especially useful after the first 8 rounds and before the boss rounds.
- D20: The D20 is a one-item game breaker as long as the Shop has a Lil' Battery available. See the tips section above for more information.
 D infinity: Incredibly powerful in Greed Mode, as the dice can now be toggled to mimic the effects of the
  D1,
D1,  The D6, and the D20, allowing Isaac to quickly gain consumables and reroll items.
 Dark Arts: Dark Arts can be used to press the button without taking any damage, kill many enemies with each activation, and have the item be constantly recharged with each wave.
- While playing as
 Tainted Judas, each enemy or projectile ran into will grant a damage buff. With the sheer amount of enemies appearing, especially in Greedier, Tainted Judas will gain an immense damage buff and can kill huge swaths of enemies with ease. Additionally, this is even more potent against
  Ultra Greed, as you can run through the many
  Greed Gapers summoned to gain even greater damage buff, as the Gapers will be clustered very closely together.
- While playing as
 Gello: Incredibly powerful, as it can be activated multiple times in the same room.
 Hemoptysis: Can be spammed to push into enemies into walls, which happens almost always due to the arena being somewhat secluded.
 Number Two: Can deal room-wide damage every 5 seconds, as well as giving you free bombs to blow up shopkeepers & secret room walls.
 Red Candle: Filling the room with flames before pushing the button will quickly kill all enemies and bosses.
- This method is no longer effective because the flames now extinguish after a set time.
 Wooden Nickel: Allows for an easy gain for a lot more money very quickly, as it can be used once per wave. If the
  9 Volt is also picked up, Isaac can use activate the item once every 15 seconds to gain infinite money as long as there is an enemy left in the room.
 Liberty Cap: Can be used to repeatedly exit and re-enter the arena to force the
  Magic Mushroom effect.
 Mom's Lock: Can be used to repeatedly exit and re-enter the arena to force the
  Mom's Knife effect.
- Counterfeit Penny, Swallowed Penny and all other penny trinkets are useful due to the nature of Greed Mode. Even
 Cursed Penny is useful if you're trying to teleport into the exit door of the floor; Although it is wise to take all money before picking the trinket up, and only using it with 1 coin left.
  Sigil of Baphomet: The wave based enemy spawns allow for constant uptime.
 Coupon: Can be used to make pickups or items free in the shop, in exchange for making them no longer restock. Can also be used to take Devil Deals for free, conserving any heart containers, which are more valuable due to red heart damage having no effect on Deal chances.
Unhelpful Items
 Blanket: Only grants a shield for the two boss fights on the final level. The shield does not activate for the regular boss waves on previous floors.
 Camo Undies: This item does almost nothing in Greed Mode, despite being able to be obtained from the Greed Mode Treasure Room.
- Due to its ability to destroy
 Shopkeepers, Camo Undies can net you some extra pennies or nickels from shops each floor. Its new effect in Repentance also nets you a risk-reward dynamic as long as you re-enter the arena. You risk by losing money but get rewarded by clearing the waves easier.
 Champion Belt:While it does provide a damage up, it also quadruples the chance for champion enemies to appear, while not being able to profit from any extra pickups dropping from champions.
 D12: Very few rocks to reroll, however, can be abused to force a hatch to the next floor.
 Eucharist: You're already guaranteed an Angel or Devil deal each floor, so all this does is ensures that it's an Angel Deal.
 Guppy's Eye: This item is substantially less useful in Greed Mode, due to the scarcity of chests.
 Guppy's Tail: This item has no effect in Greed Mode other than counting towards the Guppy Transformation.
 Holy Mantle: Only triggers once without leaving the room, however can still be useful to make use of curse rooms for free; As well as deactivating the wave button with no consequences.
 Monstro's Tooth: Only targets one enemy, virtually useless with the exception of cleaning up dead shopkeeper bodies.
 Mom's Bracelet: Very few rocks to throw.
 Mama Mega!: The explosion will only trigger once per room, making it effectively useless in Greed Mode after the first activation.
 The Mind: In Greed Mode, this item effectively becomes
  Blue Map. Other map-related items such as
  Treasure Map and
  The Compass are negated completely irrelevant.
 Pause: Using the item in Greed Mode will freeze all enemies but will not pause the timer. New waves of enemies will continue to spawn even while the effect is active.
 Soul of Cain: Will show red door outlines, but cannot generate normal red rooms, leaving only special rooms as a rare possibility. The red outlines can be used to find the Secret Room or leave the floor, however.
 Meat Cleaver: Virtually useless, especially considering how pretty much none of the champions drop any pickups.
 Dream Catcher Doesn't show the outcomes for the boss waves and is bugged in the way that it doesn't show the right items, making it useless outside of the half-soul heart it gives each floor.
 Deep Pockets: Doesn't actually increase the amount of money you gain, causing it to only be valuable if you had a way to generate absurd amounts of money, which you don't need Deep Pockets to do.
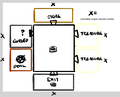
Gallery
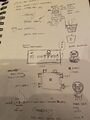
Concept for Greed mode room layouts and mechanics by Edmund McMillen.
Edmund McMillen's sketch of the Greed mode layout.
Sketch of the Greed mode store layout.


Trivia
- Ultra Greed’s theme, named “Chorus Mortis”, is a remix of the main menu theme.
- Greed Mode is the only place in the game where
 Match Book doesn't drop
  Match Stick.
 - Despite being possible to make, red rooms will only open if a generated one is a special one, or if you're on the final floor. Red Rooms on the last floor are mostly empty with no contents inside. Some red rooms on the final floor can be curse rooms or super secret rooms with some pickups in them.
- Unlike normal mode, deal chances will only appear after doing the extra wave.
 Sulfuric Acid is both a blessing and a curse since it helps to always find secret rooms for free and destroy polyps to avoid damage that out of your hands; however it is bad for The Lost and Tainted Lost because you effectively can't hide inside rocks anymore.
- Both
 Head of the Keeper and
  Eye of Greed are very useful throughout the entire run but harm you severely during the final boss fight by giving Ultra Greed and Ultra Greedier a consistent way to heal themselves.
  Money = Power is a double edged sword in the mode as it essentially forces you to choose between buying shop items, or saving them for damage and the Greed Donation Machine.
- Doodles that pop-up at the start of a run are always greed-themed in this gamemode.
- The combat room before Ultra Greed boss fight doesn't grant active item charges.
- Isaac doesn't have the animation of jumping inside a golden chest in the end, possibly drawing a parallel with the ending in which he gets stuck inside a cave, drying up and becoming Greed.
Bugs
| If the Super Secret Room is generated behind the locked (golden) Treasure Room, it is possible to get stuck by teleporting into before unlocking the Treasure Room. The Treasure Room doors all become unlocked when one of them is, unlike the normal game mode where a Treasure Room may have only one locked door, which results in the bombable wall between the Super Secret Room and the Treasure Room also being "locked". It cannot be bombed or opened with a key from inside the Super Secret Room, and unless another means of teleporting is available, the run is softlocked. |
| Using |